Cow’s Milk Free Quiche

image

Quiche is a family favorite, but given the amount of milk and cheese in it, we haven’t had it in over a year. Our chickens gave us so many eggs recently, that I could think of no other way to use them other than in a quiche. So, I experimented, and it worked the first time, which is amazing. The texture is not perfectly the same as if it had milk and cheese, but the flavor is very similar, and my kids still eat it, so it must be good.

Every good quiche starts with an amazing crust. I use this crust recipe for every crust I ever make, pumpkin pie, apple pie, chicken pot pie, and quiche. This is a butter crust, so if butter is on your list of no-nos, there are shortening and oil crusts out there that some people prefer, but the butter crust is my favorite, and thankfully our lactose intolerees can handle it.

Butter Pastry Crust

1 C flour
1/4 t salt
6 T butter
1 egg

Combine flour and salt in a small bowl. Cut in butter and mix using a pastry blender. Add egg and form dough into a ball. Flour a flat surface and a rolling pin. Roll out dough to about 1/4 inch thick. Gently place crust into pie pan and form edge as desired.

For a quiche, cover crust with foil and place rice or beans on top of the foil to keep crust from bubbling up. Cook in a 450°F preheated oven for 8 minutes. Remove foil and cook for another 4-5 minutes. Remove crust from oven and lower temperature to 325°F.

Filling

4 T butter or oil
4 T cornstarch or arrowroot powder
1 1/2 C coconut milk, divided
1/8 t cayenne pepper
1/2 t pepper, divided
3/4 t salt, divided
1/4 t garlic powder
1/2 lb. ground beef
1/4 C FD* onion or 1/2 fresh onion
7 eggs
3 C swish chard, chopped

*freeze dried

In a small sauce pan, melt butter over medium heat. Whisk in cornstarch. Add 1 C of coconut milk all at once. Stir to incorporate with butter mixture. Add cayenne pepper, 1/4 t pepper, 1/4 t salt and garlic powder. Stir continuously. Sauce will start to boil and then thicken. Remove from heat when it has the same consistency as gravy, and allow to cool.

In a frying pan, brown ground beef and add onion.

Place eggs in a medium bowl, and add 1/2 C of coconut milk. Whisk in coconut and butter sauce. It will be lumpy. Add beef and onion mixture and swish chard. Pour into crust and cook in a 325°F oven for 60 minutes. Let cool for 5 minutes and serve warm.

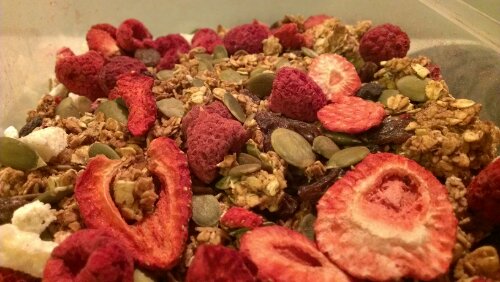
Granola Trail Mix

imageI made a goal to make granola as part of my 101 Goals, but when I started the Paleo diet, I figured that one would never get accomplished. But, I’ve switched back to my hypoglycemic diet, so that my body can get the benefits that diet offers, and oats are not evil for the time being. I stumbled across this Applesauce Granola recipe, happened to have all the ingredients already on hand, and decided to make it. I cut out the brown sugar, so the only sweetener is a tablespoon of honey. By itself, the granola is quite bland, and I was worried that it was just going to sit around for a few months, before I threw it out. Then I got the idea to make a snack out of it, and I created this delicious trail mix. The practically unsweetened granola allows the other flavors to stand out and shine. I’ve even considered eating this as a cereal, because it would be fantastic. My girls are constantly begging to snack on this, and I’m okay with them doing so.

2 C Granola
1 C FD* Raspberries
1 C FD Strawberries
1 C FD Vanilla Yogurt Bites
1 C Raisins
1 C Unsalted Pumpkin Seeds

*freeze dried

Mix together and store in an airtight container. If you really want to be super healthy, leave out the yogurt bites, as those have sugar added, made glaringly obvious by how my girls eat all of those first. If you don’t have any of the freeze dried foods, it’s still really good with just the raisins and pumpkin seeds.

Dairy Free Spinach Dip

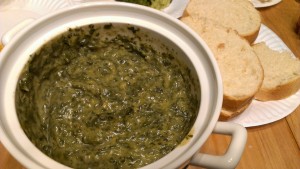
IMAG1957We had a fondue night with some friends, and needed a non-dairy dip for our lactose intolerant daughter. I wanted something like a cheesy spinach dip, without the actual cheese. After browsing many spinach dip recipes, I decided to try a dairy free white sauce, mixed with spinach. To give it a bite like cheese, I added cayenne pepper.  This is really good with chips, cheddar cheese, and bread.


4 T butter*, coconut oil, or olive oil3-4 T cornstarch or arrowroot
2 C coconut milk
dash of cayenne pepper
salt
pepper
1 T Worcestershire sauce
2 C FD** spinach
1 1/2 C chicken stock or water

*Our lactose intolerant can handle small amounts of butter.**freeze dried

1. Melt fat of choice in a sauce pan. Add cornstarch to thicken. Stir in coconut milk and heat over medium heat to thicken. Add spices and Worcestershire sauce.

2. Heat spinach and stock until stock is mostly gone.

3. Add reconstituted spinach to white sauce. Heat over medium heat for about 15 minutes until thick. Stir frequently.

Spelt Pancakes

IMAG1702Spelt is a grain, very similar to flour, but it behaves slightly different. It has gluten, so it will hold things together, but it doesn’t keep things in a nice, tidy package. I experimented with Spelt today by making pancakes for breakfast. When I got it right, they looked amazing and were delicious. The first two attempts, however, produced flat pancakes, that nobody has wanted to try so far. Those two were just Spelt. With mouths to feed, I gave up on my Spelt experimenting, and added some whole wheat flour. The results were great. Still mostly Spelt, with a bit of flour, the pancakes held a perfectly round shape and fluffed up nicely. I cut up a peach for topping, and put some butter, honey, and applesauce on the table as well.

IMAG1683

Here is the recipe:

2 C Spelt flour
1/2 C whole wheat flour
2 t baking powder
1/2 t baking soda
1/4 t salt
2 fresh chicken eggs (or just one if your chickens lay large eggs)
1 1/2 C buttermilk
3 T butter, melted
1 T honey

In a large bowl, combine spelt, wheat, baking powder, baking soda, and salt. In a separate bowl, combine eggs, buttermilk, and butter. Add wet ingredients all at once to the dry ingredients. Mix until moist. Add honey and mix as well. Cook 1/4 C at a time on a hot skillet. Top as desired, like this little girl is doing.

IMAG1690

Shelf Reliance Sausage Vegi Soup

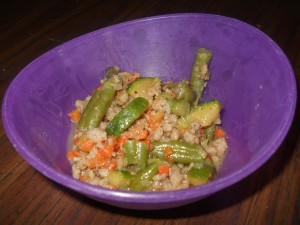
This is Shelf Reliance soup all the way. It was delicious and filled me up without needing any bread to dip in it! It took me less than 30 minutes to prepare.

Sausage Vegi Soup

Ingredients

  • 2 T butter
  • 2 T onions (FD)
  • 1/2 C sausage crumbles (FD)
  • 2 C chicken stock/ vegi stock/ water
  • 2 T celery (FD)
  • 2 T carrots (dehydrated)
  • 1/2 C green beans (FD)
  • 1/2 C zucchini (FD)
  • sea salt
  • pepper

Instructions

  1. In a sauce pan, brown onions and sausage in butter.
  2. Add stock.
  3. Add celery, carrots, green beans, and zucchini and simmer until hydrated.
  4. Sea salt and pepper to taste.
http://kstuff.net/shelf-reliance-sausage-vegi-soup/

Ramen Vegi Soup

Everything came from my food storage.

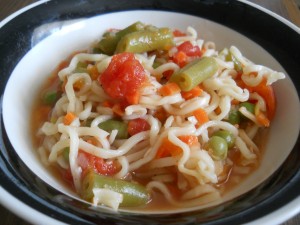
Browsing Pinterest, I came across a wonderful blog post about simplifying your life with children. It’s a wonderful read, and it lead me to another post about this lady’s daily routine. Part of their routine is lunch, like most people, and she says that she just makes soup for lunch, because it simplifies things. I love soup! For some crazy reason, it never occurred to me that it would be okay to eat soup everyday. So, today I made soup. This is a food storage soup all the way.

Ramen Vegi Soup

Ingredients

  • 1/4 C onions (FD)
  • 1/2 C dehydrated carrots
  • 2 C green beans (FD)
  • 1 C green peas (FD)
  • 1 can of diced tomatoes
  • 2 pkg ramen, crushed and seasoning packets removed
  • 1 qt of chicken stock
  • 1 qt of water
  • Salt and pepper

Instructions

  1. In a large pot, combine stock, water, onions, carrots, green beans, green peas, and tomatoes.
  2. Bring to a boil.
  3. Season with salt and pepper.
  4. Add ramen, and cook for 3 minutes.
  5. Serve with milk.
http://kstuff.net/ramen-vegi-soup/

It’s delicious, easy, and a great way to get rid of all those ramen noodles before they go stale.

What’s faster than fast food?

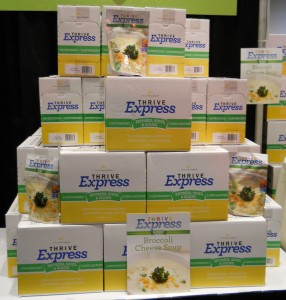
Well that would be Thrive Express Entrees, Soups, and Sides!  Announced at convention just two hours ago, in 15 minutes or less, just add water and stir.  These new products fall right in line with the Thrive food line.  They have a 5-10 year shelf life, are made using freeze dried Thrive ingredients, and are nutritious and tasty.  They come in 5-packs or variety packs, and the boxes have a tear-away front for grab n’ go access.  Thrive is already one of the fastest, ways to cook, with pre-cut food available at its freshest.  These Thrive Express products step up the convenience while maintaining healthy meals for your family.  Use Thrive Express to replace fast food, microwave dinners, and boxed dinners full of preservatives.

The new selections are: Creamy Beef & Noodles, Pasta Carbonara, Southwestern-Style Chicken & Rice, Garden Fresh Vegetable Pasta, Creamy Chicken Noodle Soup, Baked Potato Cheese Soup, Broccoli Cheese Soup, Creamy Garden Vegetable Chowder, Hearty Chili with Beans, Chili Lime chicken Rice, Loaded Scalloped Potatoes, Wild Rice Pilaf.

Food Storage Frozen Yogurt

My favorite part about being a Shelf Reliance Independent Consultant is experimenting with the food.  Today, I made frozen yogurt using my food storage!  And, it didn’t take any time at all.  Shelf Reliance sells freeze dried yogurt bites in seven different flavors: vanilla, strawberry, cherry, orange, pomegranate, passion fruit, and blueberry. And they’re on sale this month.  Let me know if you’re interested in buying some.

They’re absolutely wonderful to snack on in their freeze dried state, but if just add a little water, you’ve got yogurt!  One of the best things about the freeze dried yogurt bites is that the probiotics go dormant when they are frozen, and wake back up when you rehydrate them, which includes just eating them as is.

To make the frozen yogurt, pick your favorite flavor, and add 2 ½ tablespoons of water per cup of yogurt bites.  Let them rehydrate for about 5-10 minutes, and then mix.  If you think there are still too many yogurt bites that didn’t rehydrate, add more water in ½-1 tablespoon increments until you are satisfied, but be careful not to add too much water, or you’ll have really thin yogurt.  At this point, not all of the yogurt bites need to be rehydrated, the mixture can be a little lumpy still.  Chill the mixture for about 30 minutes.  When that’s done, mix it again to get rid of all the lumps.  Then follow the instructions on your ice cream maker, and you’ll have a great treat straight from your food storage!

I’ve found that two cups of yogurt bites and 5 tablespoons of water make the perfect amount for one person.  Try adding some freeze dried berries while you’re at it.

Enjoy!